

How We Rebuilt a Completely Destroyed Holden Commodore: Before & After
Some repairs are complex enough that they deserve their own story.
This is one of them — a custom bronze Holden Commodore VX that came into our North Geelong workshop with front-end damage so severe it looked like a write-off candidate. It left looking better than it did before the accident.
Here's exactly how we did it.
The Before: What We Were Working With
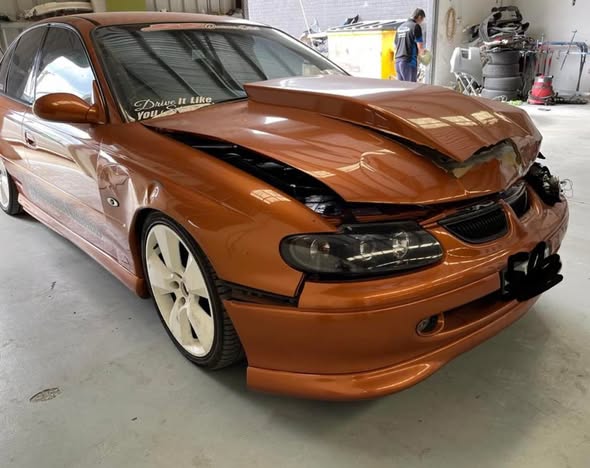
The Commodore arrived with major front-end collision damage. The front panels were crumpled, structural components had absorbed significant impact, and the custom bronze metallic paint — a non-standard colour — made the paint matching challenge substantial.
What made this job particularly demanding wasn't just the extent of the damage, it was the vehicle itself. This Commodore had been custom-modified and finished in a bronze metallic paint that doesn't exist in any standard formula. Every spray painter who's worked with custom metallics knows the challenge: you can't just look up a paint code and spray. You formulate, you test, you spray test panels, you compare under multiple lighting conditions, and you iterate until the match is right.
This kind of care adds time. It's worth every minute.
The Repair Process
Stage 1: Full Strip-Down and Structural Assessment
Before any panel work begins, the vehicle needs to come apart. This serves two purposes — it gives us access to the underlying structure that can't be assessed from outside, and it prepares for the panel work to follow.
On this vehicle, the strip-down revealed structural damage to the front rails that wasn't visible externally. This is exactly why we don't skip the strip-down phase, even when the damage looks primarily cosmetic. Structural repair is foundational — everything else sits on top of it.
The vehicle went onto our chassis measuring jig, which uses precisely positioned targets and measurement software to compare the actual structure against the manufacturer's specification. This tells us exactly where deformation has occurred and how much correction is needed.
Stage 2: Chassis and Structural Repair
Working from the jig measurement data, our structural repair technicians used a combination of hydraulic straightening equipment and precision pulling to restore the front rails to within manufacturer tolerances.
This is the work that matters most for safety. A vehicle's crash performance in a future accident is directly related to the integrity of the structural elements. Cosmetic perfection on top of compromised structure is dangerous. We don't leave this workshop until the structural measurement is right.
Stage 3: Panel Repair and Replacement
With the structure corrected, panel work began. Some panels could be straightened and reskinned. Others were beyond economical repair and were replaced with genuine parts.
All panel edges and surfaces were worked until they met our standard for smoothness and alignment. Panel gaps were set to manufacturer specification. This stage is time-consuming when done properly — it's the foundation that the paint work sits on.
Stage 4: Paint Formulation and Matching
The custom bronze metallic was the most technically demanding aspect of this repair.
Our spray painter started from the closest available formula and test-sprayed onto separate panels to compare against the existing colour in multiple lighting conditions — direct sunlight, shade, artificial light. Each test round involves adjustments to the formulation until the match is correct.
The final match on this vehicle required several formulation iterations before we were satisfied. "Close enough" isn't a standard we accept when the whole panel is visible and adjacent to original surfaces.
Stage 5: Paint Application and Finishing
With the formula confirmed, panels were prepared, primed, and the colour coat was applied in our downdraft spray booth. Controlled airflow and temperature ensure consistent application and proper curing.
After the colour coat, clear coat was applied and allowed to fully cure. The panels were then colour-sanded and machine polished to the mirror finish you see in the after photo.
Stage 6: Reassembly and Quality Inspection
The vehicle was reassembled with all components refitted, all gaps checked, and all functions tested. Our final quality inspection runs through every point on our checklist before the car leaves the workshop.
The After: The Result
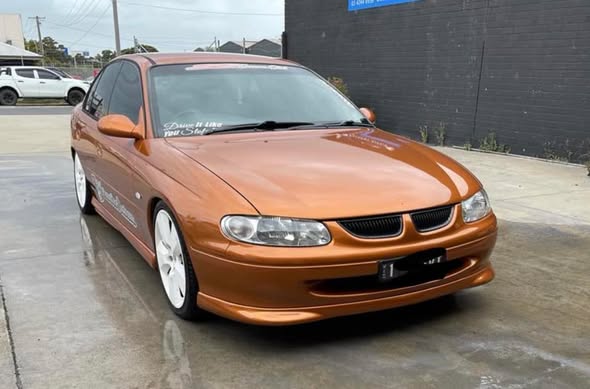
The finished vehicle speaks for itself.
The bronze metallic finish is seamless across the repaired and original panels. The front end sits correctly, doors shut with precision, and the panel lines flow as they did from the factory. The structural repairs underneath give the owner a vehicle that will perform correctly in the event of a future impact.
This is what we mean when we talk about restoring a vehicle to pre-accident condition. Not approximately right. Exactly right.
What This Repair Required
For context on the scope of work:
- Full front-end strip-down and structural measurement
- Chassis jig straightening of front rails
- Multiple panel repairs and replacements
- Custom paint formulation across multiple test iterations
- Full colour coat, clear coat, cure, sand, and polish
- Complete reassembly with gap and function checks
From drop-off to collection: three weeks.
When to Trust a Custom Vehicle to a Panel Shop
Custom and modified vehicles represent a particular challenge for smash repairs — and a particular test of a workshop's capability.
Standard repairs can be done adequately by many shops. Custom paint matching, non-standard modifications, and vehicles with specific character that the owner wants preserved require a team that takes pride in getting details exactly right.
If your vehicle is non-standard in any way — custom paint, modifications, high-spec OEM finish — ask potential repairers specifically about their experience with custom colours and non-standard vehicles before you commit.
Your Vehicle Deserves the Same Standard
Whether you've got a custom Commodore, a family SUV, or a work ute — the standard of care we apply is the same.
If your vehicle has been damaged and you want to see what a thorough, quality-first repair looks like in practice, contact us.
Free assessment and written quote: call 03 4244 8938 or book online.
North Geelong Accident Repair Centre | 6 Freedman St, North Geelong VIC 3215 | Mon–Fri 8AM–5PM | 24hr Towing: 0420 801 465